Boston Children's Museum
308 Congress Street, Boston, MA 02210
617-426-6500
© Boston Children’s Museum 2024
Website Design by JackrabbitSeveral years ago, educators surveyed recent graduates from The Massachusetts Institute of Technology, the world’s top technical school, and asked them to light a flashlight bulb with a battery and a piece of wire. Few of the graduates were able to do it. Understanding basic circuits comes from experience, and many children (and adults!) haven’t had that experience. But once your students have mastered the basics of lighting a light bulb with a battery, there are limitless possibilities to the kinds of investigations they can engage in.
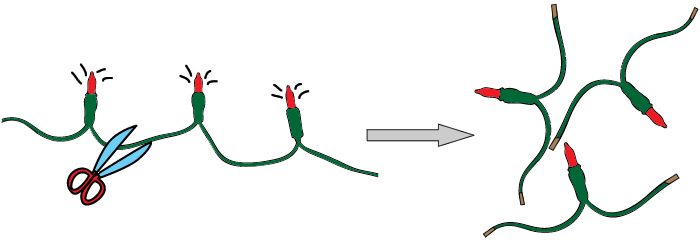
You’ll need to prepare the bulbs and wire for your students to use. Pick up one end of the string of lights and cut right through it with the scissors. You’ll find that after the first bulb, you’ll have 3 wires intertwined. Two of these wires will be free and the third will connect all of the bulbs together. Unwind the 2 loose wires—you’ll be cutting them into pieces and stripping them later. Now you should cut the wire connecting the bulbs. Cut the wire halfway between each bulb—this will leave wires of equal length (See Figure 1).
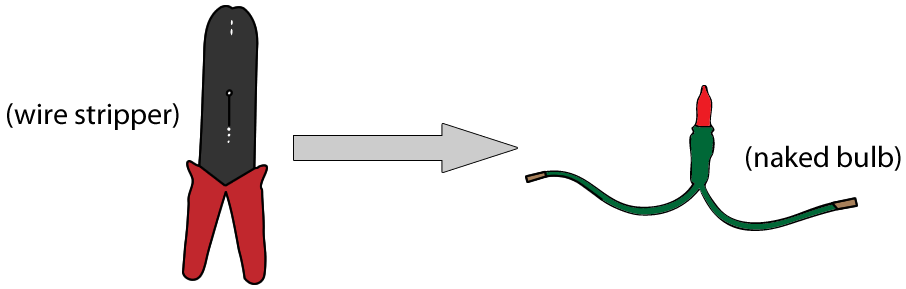
Once you have the bulbs separated, you’ll need to expose the metal part of the 2 wires on each bulb using the wire stripper. Most wire strippers have holes near the handle—open up the stripper and place 1 of the bulb’s wires about 1 inch into the hole of the wire stripper that’s just a little bit smaller than the wire. The 14 or 16 gauge hole works for most holiday lights, but sometimes they make the wires different sizes. Squeeze the handles of the wire stripper together and pull away from the bulb—with practice, you’ll pull away just the plastic coating of the wire, leaving the metal part inside exposed. Your wire is now as naked as the day it was born (See Figure 2).
If you show some of your older students how to do this, you can have them strip the wires—there’s a lot to do. Once you’ve stripped enough bulbs (at least 60), cut some pieces of the extra wire you put aside—anywhere from 6 to 12 inches should be good. Cut enough pieces so each team has a piece. Strip both ends of the wires. Once your wires and bulbs are prepped, you’re ready to play! Before introducing the activity to your students, try it yourself. See the tips under Suggestions (in the “Make it Better” step) if you get stuck.
Ask your students if they have anything in their homes that uses batteries. What do the batteries do? What are some things that batteries help make work? Write down the list of objects that they come up with, and highlight anything that lights up. Introduce the challenge to them.
Can you make a bulb light up using just a battery?
After 5–10 minutes, when most teams have lit their bulbs, bring your students together to talk about what they’ve done. What parts of the battery gave them clues that helped them figure out how to light the bulb? What parts of the bulb give them clues? Have volunteers show how they lit their bulbs. Did everyone do it the same way?
Send your students back to explore some more. Give each team 3 or 4 more bulbs and ask them to now work together in lighting their bulbs. Offer them the masking tape as a new material, but let them decide how they might use it (the tape can be used to help hold the wires to the ends of the batteries). Can they light 2 bulbs at the same time with 1 battery? How about 3 bulbs at the same time? Can they use more than 1 battery to light their light bulbs? Can they light the bulb with a battery and a piece of wire? Let them explore and have them share their discoveries with each other at the end of the session.
Boston Children's Museum
308 Congress Street, Boston, MA 02210
617-426-6500
© Boston Children’s Museum 2024
Website Design by Jackrabbit