Juggling

Health Math
Time Multi-session
Age 7 & up
Group Size 4 or more
Tags Balloons, Bottles, Coordination,   more...
Game Games

Exercise your body and your mind by learning how to juggle!

Juggling is not merely a fun activity, but it has many potential benefits as well. Juggling can help improve eye-hand coordination, problem-solving skills, ambidexterity, balance, motor skills, rhythm and timing—just to name a few. Research has even shown that people who learn how to juggle actually increase their brain size! In addition, self esteem, confidence, perseverance, teamwork and communication can reap the benefits of juggling, and children who learn best kinesthetically will really take to this activity.

Preparation

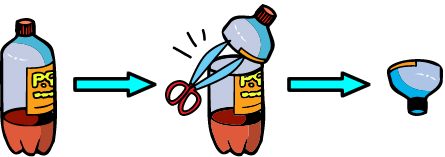
Prepare the funnels – cut the bottles in half using a utility knife (or scissors if you don’t have a knife—but the knife is much easier). Be careful! Cutting plastic can be tricky, and once it’s cut, it tends to be sharp. You’ll be keeping the top sections of the cut bottles—notice how they look like funnels (See Figure 1)?

As a safety measure, place some duct tape around the cut end so the sharp plastic is not exposed.

Juggling

Suggested Materials

  • 9″ or 11″ round balloons (12–15 for each student)
  • Millet, rice or lentils (1 large bag of millet or several bags of rice or lentils)
  • 1-liter plastic soda/water bottles (5-10)
  • Scissors
  • Duct tape (1-2 rolls)
  • Utility knife (for the teacher only)
1

Make it Matter

Opening Discussion

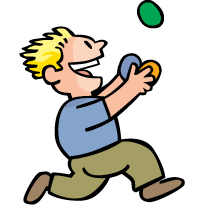
Ask your students if anyone has juggled before. What does juggling look like? What do you usually juggle with? Does anyone know how to juggle? If you have a volunteer, have them show other kids what they can do (you’ll have to have a few juggling balls prepared to give them). You can also show them what you mean by juggling the balls yourself.

The Challenge

Make your own juggling balls and then learn how to juggle!

2

Make it Happen

Doing the Activity

  1. Have kids work in pairs for this activity.  Their first job is to make their juggling balls – follow the instructions here.  You should demonstrate the process described below in front of them in order to show them how to make the balls.
  2. Wrap the lip of a balloon around the mouth of the plastic bottle funnel (the mouth is the part you would drink from if your funnel was still a bottle). Make sure it’s on good and tight.
  3. Scoop some millet into the funnel. Some of it will spill into the balloon, but you’ll want to get more in there. There are many ways to do this – pushing it down through the funnel with your fingers, pulling and squeezing the balloon, etc—experiment and discover which method works best for you.
  4. Once your balloon is filled to about the size of a plum, carefully remove it from the funnel, fold the open end down and tape that end to the filled balloon so the millet won’t escape.
  5. Cut the end off of a second balloon – you should cut this balloon about in half. Discard the blow-hole end (See Figure 2). Stretch this half-balloon over the millet-filled ball so that the taped end of the ball is hidden.
  6. Repeat this last step with 3 more balloons – 4 or 5 balloons total should make a pretty sturdy juggling ball. Make three balls and you’re ready to juggle.
  7. Juggling takes practice! Follow the instructions below, and try a little bit each day. You can also have your students practice facing a wall—that way, the balls won’t stray too far as they fall to the ground:
    • The key to juggling is throwing – if you’re good at tossing the balls, you’ll pick up juggling very quickly. So the best way to begin is with just 1 ball. Throw the ball in an arc from hand to hand so it peaks at about eye level. The ball should be thrown from the palm of the hand, and your hands should be at about belly button level and on either side of your body. After you have perfected the throw and catch with 1 ball to and from both hands, move on to 2 balls.
    • Juggling with 2 juggling balls: Hold 1 ball in each hand. Throw the first ball (it doesn’t matter which, but most people start with their dominant, or writing hand) as you did in the first exercise, but when it reaches its peak (at about eye level), THROW the second ball. Catch the first and then the second. DO NOT simply place the second ball in your other hand—this is a common mistake people make when they begin juggling. The second ball must be thrown in the air, just like the first. Practice this until you are comfortable with starting with either your left or right hand.
    • Once you can throw 2 balls from hand to hand and catch them, you are ready to move up to 3. Hold 2 balls in one hand (either hand, whichever is more comfortable—usually your dominant hand) and one in the other. Start by practicing 3 throws. Throw a ball from the hand holding 2 balls (we’ll say the right hand). As this first ball reaches its peak, throw the ball from your left hand. The first ball will be caught before the second reaches its peak. As the second ball peaks, throw the ball from your right hand. This is quite difficult, especially catching the balls. Don’t be disheartened if it seems as though the balls spend more time on the ground than in the air. All you need is practice. When you can get 3 consecutive throws and catches, then add another throw. After 4 throws and catches, make it 5 and then just keep going. Before you know it, you’ll be juggling!
3

Make it Click

Let’s Talk About It

After 5–10 minutes, bring everyone together to talk about what they’ve done. Does anyone have any tips for the other children? What’s the hardest part of learning how to juggle? What’s the most fun part?

4

Make it Better

Build On What They Talked About

Have your kids practice some more. Do this activity every once in a while and watch their progress!

Suggestions

  • Focus on positives—if a child has only progressed to throwing and catching one ball, or two, that’s OK!
  • A nice summation from an online article (http://www.icanjuggle.com/academic.html): “Juggling provides a series of sequential problems that require the student to calm down, pay attention, listen analytically, observe critically, focus on one activity at a time, plan a learning strategy, go step by step, stay on task, screen out distractions, manage their muscles to act appropriately and with the desired results using successive approximations, persevere through a series of minor failures (drops), analyze final results of the process, and incorporate the newly learned activities into a larger pattern of complex learned activities that can be demonstrated and taught to others. It is a limitless, cumulative, branching model which teaches creative problem solving through direct experience and enhances creativity by offering intrinsic and extrinsic reinforcement with every gain in skill!”
Print Friendly