Boston Children's Museum
308 Congress Street, Boston, MA 02210
617-426-6500
© Boston Children’s Museum 2025
Website Design by JackrabbitPrint making is the process of transferring an impression from 1 object onto the surface of another. In this activity, students will learn that a single object can be used to make infinite images of that object. They will gain a basic understanding of the printing process and will explore the printing possibilities of natural and found objects such as leaves, corrugated cardboard, keys, etc. Students will also gain an appreciation for the detail they can reproduce when printing and for the intricate features of everyday objects.
Collect objects from around your afterschool. They should be small, have some texture (smooth, round objects don’t make very interesting prints), they shouldn’t be too thick and they should be things you don’t mind getting pain on. Because you are using water-based paints, everything you use will clean up but you should still avoid using anything valuable. Place newspaper on tables to keep them clean.
Ask your students if they have ever seen a dollar bill before. Do all dollar bills look different or do they look almost exactly the same? Did they ever wonder how are the pictures are put on the paper, or how so many can be made that look the same? Tell them that paper money (and lots of other things) are “printed”. There are lots of different ways to print things—dollar bills are created when an image that looks like a dollar bill is made on a piece of metal, ink is put on the metal and paper is pressed onto the metal, making a print. Thousands of pieces of paper can be run over these metal plates, and the dollar bills will all come out looking the same. Tell children that today they will be making their own prints out of objects from around the afterschool.
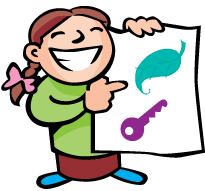
Create your own beautiful prints from these found objects.
After each child has made 1 print, gather everyone together to talk about what they have done so far. Did anyone discover tips or tricks for making good prints? Did anyone discover something that made it harder to make a good print? Look for children that talk about pressing too hard when they are burnishing (this can smudge the print or even tear the paper), children who used too much or too little paint, etc.
Did anyone notice any interesting details in their prints? What else do they notice? Are there any other objects they can think of that might make interesting prints?
If you have the time and it is nice outside, take your children on a walk around your afterschool center to find natural objects that they could use in their print making. Look especially for leaves, seeds, sticks, etc. Have students bring these objects inside and make more prints with them. You can also have them simply make more prints with the objects you have gathered.
When students make a print, invite them to tape it up on the wall. Near the end of the session, when all the printing is done, ask students to walk around the room and look at the other children’s prints. What do they notice? What objects made interesting prints? Did anyone combine a few different objects together to create a print?
Ink – a material similar to paint, but thinner in consistency, that is suitable for making prints.
Burnishing – the process of rubbing a printing object so ink is transferred evenly onto paper.
Print – the image that is created when a stamper or object is inked and pressed onto paper.
Stamper – an instrument containing a raised design or text that makes reproductions of the design or text when inked and pressed on paper.
Surface – the topmost layer of an object. On a stamper, the raised surface is the part that will create the printed design.
Texture – the appearance and feel of a surface.
Boston Children's Museum
308 Congress Street, Boston, MA 02210
617-426-6500
© Boston Children’s Museum 2025
Website Design by Jackrabbit