Boston Children's Museum
308 Congress Street, Boston, MA 02210
617-426-6500
© Boston Children’s Museum 2026
Website Design by JackrabbitMaking homemade wind chimes is a particularly satisfying activity. Not only do they sound great, but while children are constructing them they get a chance to use creative thinking and fine motor skills and to learn about the properties of different materials.
Create a simple wind chime ahead of time to show to your students (see directions below). Gather all materials, and try to have as much variety in the “found materials” as you can. Some of the “found materials” should be made of metal (like metal washers, spoons, etc.) and some should be made of other materials (like plastic spoons, sticks or wood, seashells, etc.). Cut the string into pieces between 6″ and 10″ long. You’ll need about 100 pieces of string.
Create a wind chime that makes a sound when the wind blows.

Ask your students to close their eyes. Hit 2 objects together (2 metal objects will make the loudest sound, but you could use any materials as long as the sound is noticeable) and ask your students to guess what they are made of. Did the sound remind your students of anything?
Show them the wind chime you made, and blow to make the objects in your chime bang against each other. What are some other objects around the afterschool center or around people’s houses that might make sounds in a wind chime? Brainstorm a list and write down students’ ideas. You can then either show your class the materials that you have already gathered for them, or you could complete the activity another day, giving you (and them) time to collect as many things from their brainstormed list as you can find.
Create a wind chime that makes a sound when the wind blows.
After a few minutes of experimenting with the sounds their objects make, gather all of the teams together to talk about what they’ve discovered. Did all of the objects make the same sounds? Did any objects surprise them? Do some objects of different materials make better sounds when they hit each other than other objects do?
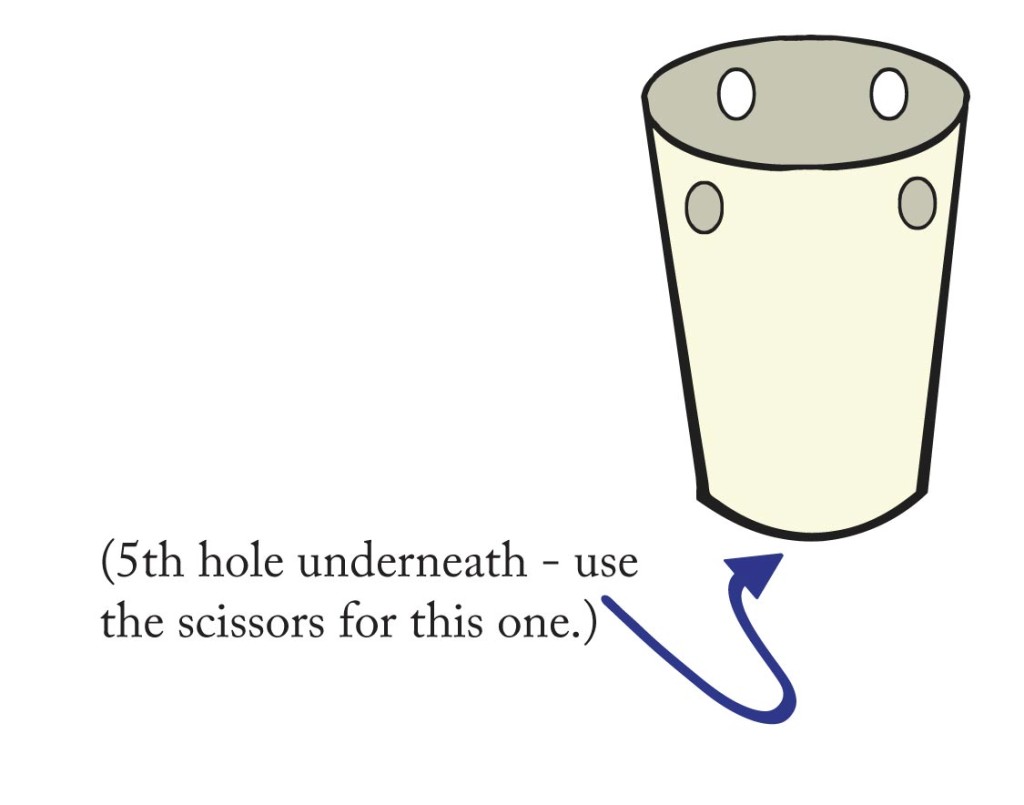
After this discussion, send the teams back to make their wind chimes. If they would like, they can select new objects based on what they learned about the sounds their original choices made. Teams will need the paper cups and hole punches to construct their chimes. Teams should punch 4 holes around the lip of the cup, and a fifth hole in the center of the bottom of the cup. It should look like this (See Figure 1).
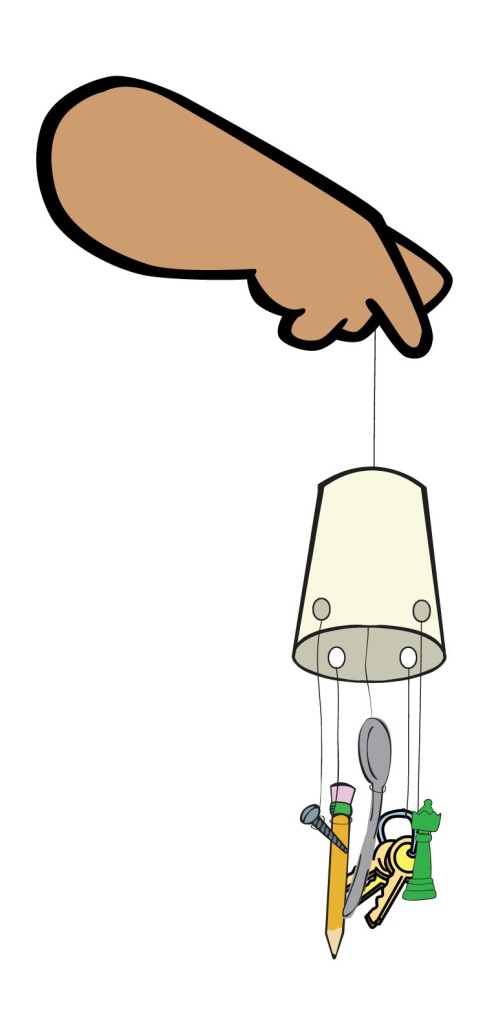
Teams can then tie one end of a piece of string to an object and the other to the cup through one of the punched holes. When all 4 objects are tied around the lip of the cup, the fifth object can be attached through the hole in the bottom of the cup, so that it hangs down in between the other 4 objects. You can do this by tying a knot or taping the end of the string to the cup. It is sometimes good to have the largest object as the object in the middle. The last step is to attach a long string from the top of the cup to hang the wind chime from. A finished wind chime might look like this (See Figure 2). Find a tree branch or somewhere near an open window to hang the chimes, and listen to them when the wind blows!
Boston Children's Museum
308 Congress Street, Boston, MA 02210
617-426-6500
© Boston Children’s Museum 2026
Website Design by Jackrabbit